Effortlessly conduct surveys by creating data collection forms, storing form responses, and conducting an in-depth analysis using Klera.
Survey Creation Work Flow:
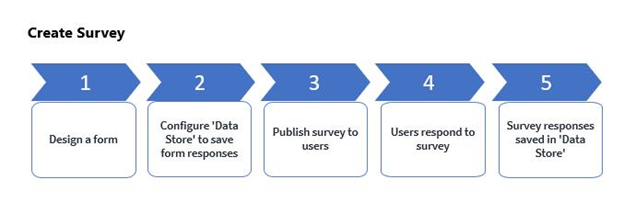
Steps to design and conduct surveys:
Step 1: Create a Data Collection Form
Step 2: Save Form Responses in a Data Store
Step 3: Launch the Survey
Step 4: Analyze Survey Response
Step 1: Create a Data Collection Form
1. Create an Exploration
A. On the Home page, click on  -> New Exploration.
You will now see a new Exploration.
B. Name your exploration.
2. Create a Form
A. Click on Forms > New > Blank Form. You will now see a Form Designer.
B. Enter the Title of the form and Width ( Percentage of the container width).
C. Configure Form Fields
You can add survey questions by adding fields in this section. Each field corresponds to a question.
- Data Type- Select the data type
- String
- Date
- DateTime
- Time
- Boolean
- Double
- Integer
- Long
- Field Type.
- User-Defined- The user can manually enter a response.
- Auto Generate- These fields do not require user input. The values are automatically generated by the system, e.g. Current date or User Id.
 Note- Auto Generate option is applicable for DateTime and String types only.
- Label
- Provide the question text to be shown on the form.
- Widget
- Short Answer- For Single-line text input.
- Paragraph- For Multi-line text input.
- Radio Button- For multiple-choice questions that allow selection of a single option. Options are shown upfront as a list.
- Multiselect- For multiple-choice questions that allow the selection of multiple options. Options are shown upfront as a list.
- Dropdown- For multiple-choice questions that allow selection of a single option. Options are shown as a drop-down list.
- Date- For date value from a pop-up calendar.
- Time- For time value from a pop-up calendar.
- DateTime- For a combination of both date and time values from a pop-up calendar.
- Source of Values- Applicable to Drop-down, Multi-select and Radio button only
- Static list - List of values to be shown in the widget shall be provided as comma-separated strings. E.g., providing ‘Major,Minor,Trivial’ here will show three values (Major, Minor and Trivial) in the drop-down list.
- Named list - If the list of values to be shown in the widget are not fixed and known at the time of form creation, then you can provide a Named list here. A named list can be populated with the data fetched from a database, for example.
- Required
- Select this checkbox to create mandatory questions in the form.
D. Configure Submit Button
- Submit Button Text
- Provide a button label
- Reset Form on Submit
- Select this checkbox to configure the form such that when the user clicks on the Submit button, all the form fields will reset to their default values.
E. Click on Next.
F. Add Floor operation to access the created form
Next, you will see a pop-up to configure the Floor menu operation that opens the form created in the above steps. Enter the following details:
- Operation name
- Operation description
- Select an existing menu option or/and,
- Provide a new menu option
- Auto Generate
- Select this checkbox to auto-create a primary key to uniquely identify each response generated by this form, or
- Select a field from the drop-down which will uniquely identify each response.
G. Save the form
H. Open the Form
- Right-click on the Floor -> Select the operation that we defined in the form builder in previous steps.
- Drag and drop the Form from the Left Panel on the Floor.

3. Test the Form
A. Fill in sample data and click on
B. A dataset containing the responses is generated in the View Panel.
- Drag and drop the dataset and place it next to the Form on the floor.
- Connect Form and Dataset to ensure that all future responses are also stored in the same dataset.
- Click on
 icon -> Reuse Mode -> Replace
- Click on
| Note: It is mandatory to keep both form and dataset on the same page. To learn more about Reuse Modes, click here. |

Step 2: Save Form Responses in a Data Store
Once the survey responses are submitted, save/write them to a data store. Choose where to save form responses.
1. Add a New Dataset
A. Right-click on dataset container > Select Dataset > Add Records.
B. Skip the ‘Reduce Data’ step and click on Apply.
C. In the Add Records pop-up, select Add New Dataset, and provide Dataset Name.
D. Click Add Records.
E. A dataset ‘Execution Details’ will be generated in the View Panel. Drag and drop the dataset on the Floor to view the added response.

Step 3: Launch the Survey
1. Finalize the Look and Feel of the Survey
A. Hide all the containers, except the one which contains the form.
- Click on the
 icon and select Hide Container.
B. Rename the tab
- Right-click on the tab containing the form and select Rename. Provide a new name. Your survey is ready.
Note: You can click on the  icon to see the Execution Graph for the operations performed to create the survey. icon to see the Execution Graph for the operations performed to create the survey. |

2. Distribute/Publish the Survey
A. Save your survey.
B. Now you are ready to publish this survey to other Klera users in your organization.
To learn more about how to save and publish an App, click here.
Step 4: Analyze Survey Responses
To learn how to conduct in-depth analysis and derive powerful insights from survey responses, refer here.