Edit/Delete Alert Defined on a Visualization
Alerts and Triggers
When data reaches important thresholds, you need to pay immediate attention to it. Alerts and triggers, notify you when your data meets certain thresholds or anomalies are detected.
Klera enables you to set alerts on such critical situations and trigger actions on them.
Let us understand this with examples.
Suppose you have a Bar or Pie chart depicting bugs, stories, epics and you want to monitor when the bugs cross a threshold, let's say 100. You can set an alert when the value of the Bar/Pie crosses this threshold.
You can set alerts on string values too. So, for example, you want to be alerted if descriptions in your column contain the word- Critical. Klera will raise an alert when this criterion is matched.
When an alert is raised, it can trigger one of the following actions:
- Send Email to Shared Users
- Execute another Exploration
Type of Alerts:
Alert on Visualization
Alert on visualization can be used when you want to monitor change in the value of Visual elements of any Visualization (e.g. Size of a Pie slice, Bar etc.) Alert on visualization is raised when the value of a measure (i.e. aggregate function like count average etc.) crosses a threshold.
 Note: You can define only a single alert on a visualization, unlike dataset level alerts where you can set multiple alerts. Note: You can define only a single alert on a visualization, unlike dataset level alerts where you can set multiple alerts. |
Create Alert on Visualization
- Click on the icon
 of the visualization on which you want to create an alert, and select ‘Add Alert’.
- Provide the following input in ‘Add Alert’ pop-up:
- Alert name – Name for this Alert.
- Alert When – When will the alert be raised:
- All - All the values of this measure meet the criterion.
- Any - Any one value of this measure meets the criterion.
- Value Of – You can choose one of the measures used in this visualization (Non-aggregated visualizations like Grid will show columns here).
- Is - Options according to the type of the measure/column, e.g. ‘Less Than’/’Greater Than’ etc. for measures and Contains/Equals for text dimensions.
- Value – The threshold value that must be breached by the measure to raise an alert.
- Where - Define this if you want to set an alert when the value of a selected dimension is breached.
For e.g., assume the Bar chart is showing bars for different Type of issues (Bugs, Stories, Epics and Objectives). You can set an alert when the bar for “Bugs” crosses a threshold by providing value- “Bug” in this field.
- Click on NEXT to define actions to be triggered when the alert is raised.

- Provide the following input to define the trigger.
- Trigger name – Name of the trigger.
- Trigger type– Select one from the drop-down.
- Execute Exploration - To run another Exploration when the alert is raised.
- Send Email - To send an email when the alert is raised.
- Frequency – Configure the frequency at which the system should raise an alert after the threshold is met.
- Depending on the trigger type chosen in previous steps, you will get different options.
For ‘Execute Exploration', you will get the list of Explorations to choose from.
 For ‘Send Email, you can define To, CC, BCC, Subject and Content of the email.

- Click ‘Add’. Once the alert is defined you will see a bell icon
 on the container header.

Edit/Delete Alert Defined on a Visualization
To edit or delete the alert created on a visualization, follow below steps:
- Click on icon
 on the visualization on which alert is already defined.
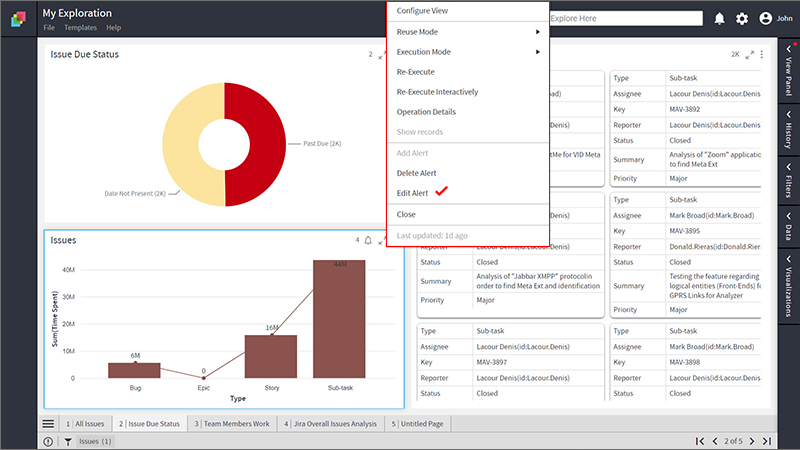
- To Edit: Click on ‘Edit Alert’. Enter details and click on UPDATE.
- To Delete: Click on ‘Delete Alert’, provide confirmation and click Ok.
Dataset Level Alerts
A dataset level alert is raised when the value of a field of a dataset meets a given criterion. You can define multiple alerts on a single field of a dataset.
How to Create an Alert
- Open the Data Panel, search the dataset and field you want to put an Alert on.
- Click on overflow menu
 of the field on which you want to create an alert.
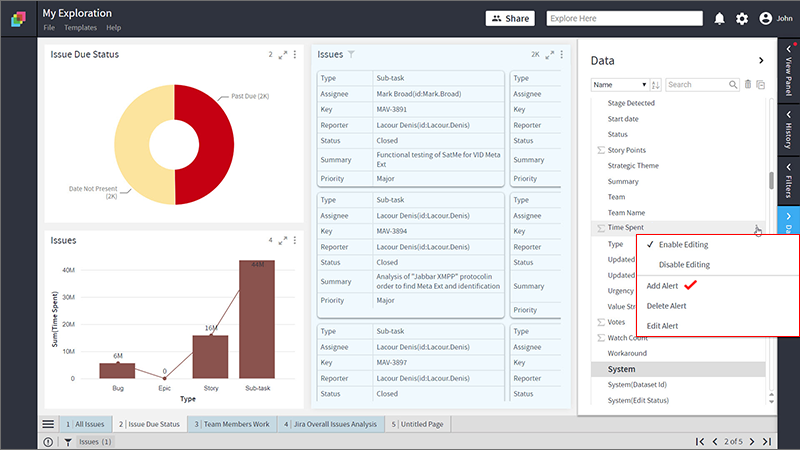
- Click on ‘Add Alert’.
- Provide the following input in the pop-up form:
- Alert Name – Name for the Alert.
- Alert When – Alert can be raised in either of the following two conditions:
- All - Alert when all the rows of this column meet the threshold condition.
- Any - Alert even if the value in any one row of this column meets the threshold condition.
- Value Of – Alert is being added to this field. It is a Read-only entry in the form.
- Alert Condition - This field will show options according to the type of the field, e.g. 'Contains''/'Equals' for Text fields and ‘Less Than’/’Greater Than’ etc. for numeric.
- Value – The threshold criterion which must be met to raise an alert.
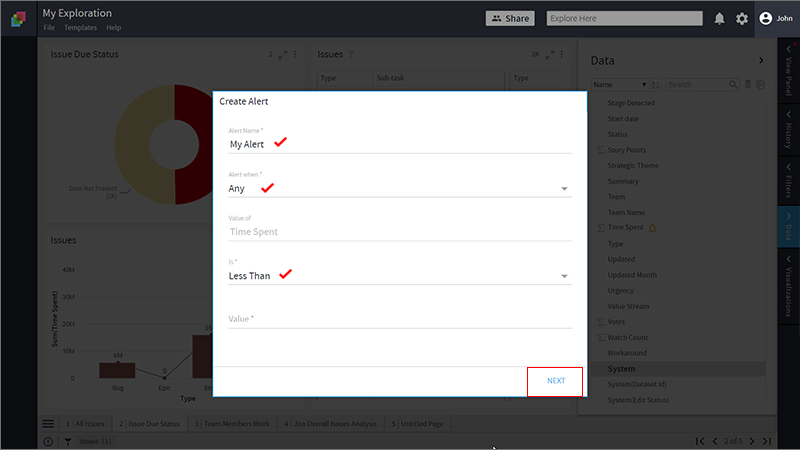
- Click on NEXT. You will get another form where you need to define “actions to trigger” when the alert is raised.
- Trigger name – Provide a name
- Trigger Type– Select from the drop-down list
Execute Exploration - To execute another Exploration when the alert is raised.
Send Email - To send an email when the alert is raised. - Frequency – Configure the frequency at which the system will raise the alert. This shall be used for frequently occurring alerts.
- If Trigger Type is ‘Execute Exploration', then select the Exploration which shall be run when the alert is raised.
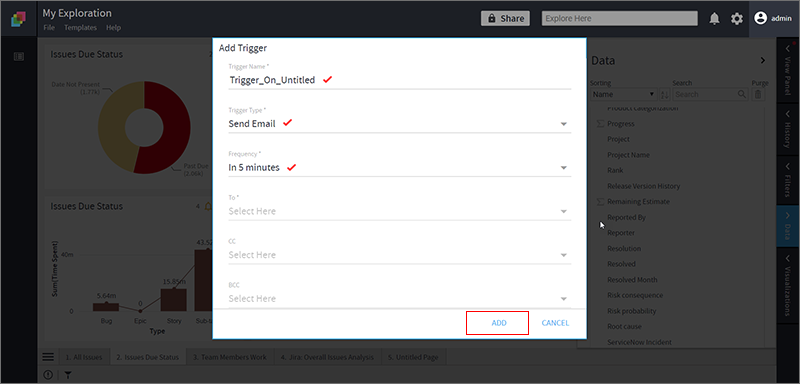
- If Trigger Type is ‘Send Email’, then you need to provide the following details:
- To, Cc, Bcc – Select the recipients from the list of email ids of shared users.
- Email Subject – As desired.
- Email Content – As desired.
 Note: Email can only be sent to users with whom the Exploration is shared. Note: Email can only be sent to users with whom the Exploration is shared. |
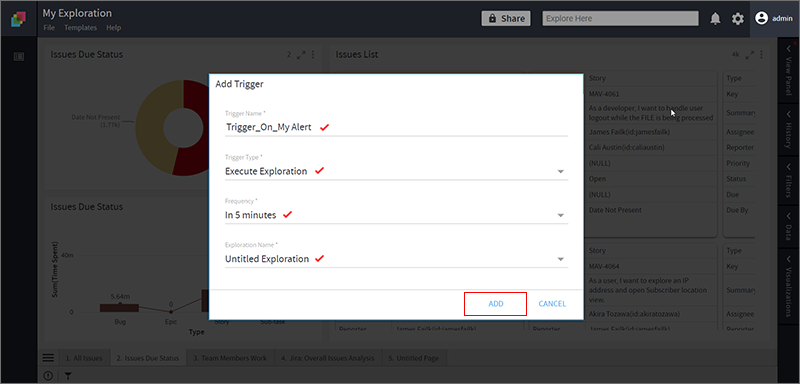
- Click on ‘Add’.
- A Bell icon
 is shown next to the column name in the Data Panel.
You can add multiple triggers by following the steps defined above.
Edit Alert
To edit an alert, follow these steps:
- Open the Data Panel, Search the dataset and field you want to put an Alert on.
- Locate the column with alert you need to edit (You will see
 icon besides field name).
 - Click on overflow menu
 and select ‘Edit Alert’.
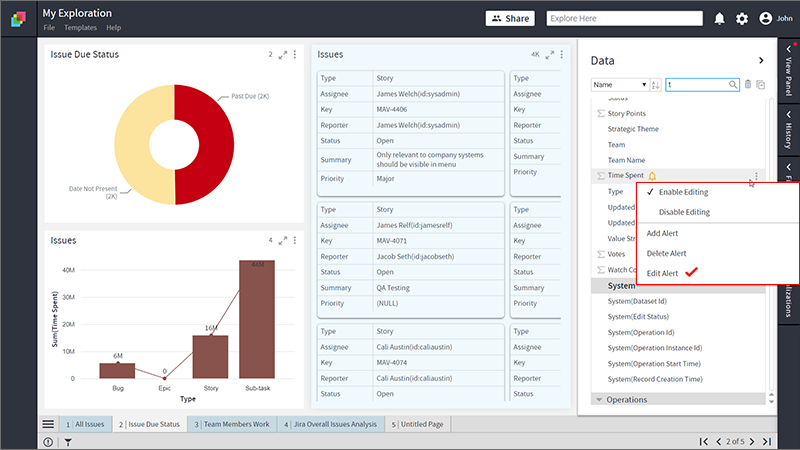
- You will see Edit Alert pop-up form.
- If multiple alerts are defined on this field then select an alert from the drop-down list. Make necessary changes and click NEXT.
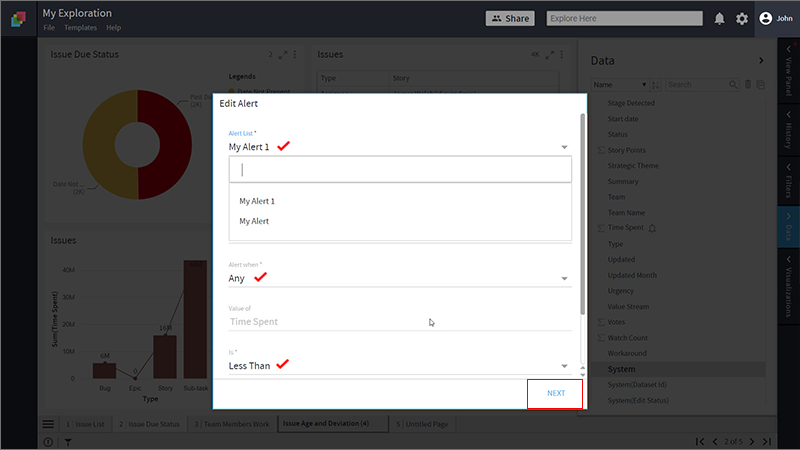
- Trigger details form will pop-up.
- Change the Trigger details and click on UPDATE.
Delete Alert
To delete an alert, follow these steps:
- Open the Data Panel, Click on
 icon to view the columns of the dataset.
 - Go to the column where alert needs to be deleted. (You will see
 icon besides field name).
 - Click on overflow menu
 icon and select ‘Delete Alert’.
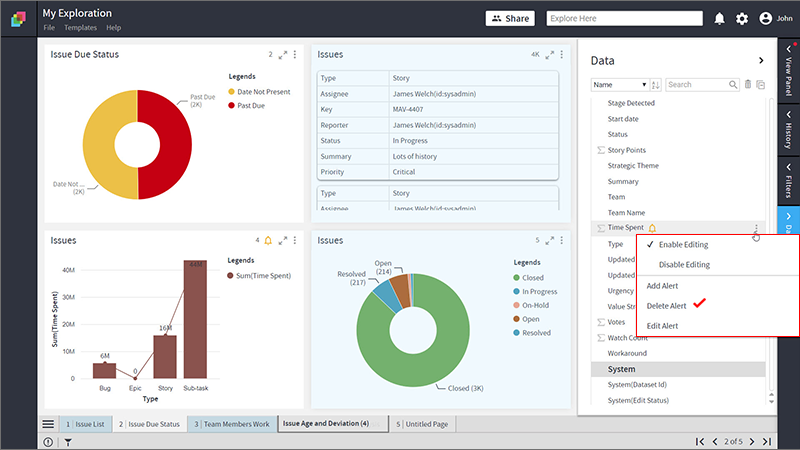
- A pop-up box will show existing alerts on this field. Select and click on ‘DELETE’.
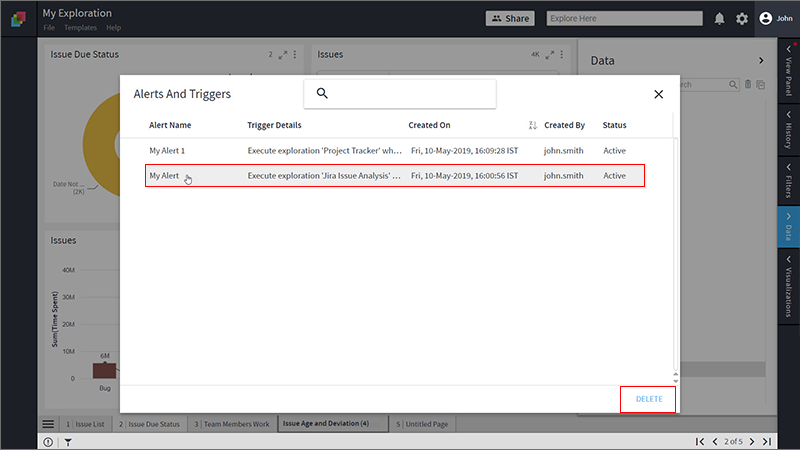
- After confirmation, the alert is deleted and you can see the remaining alerts on the screen.
- Close the pop-up box by clicking on the
 icon.
icon.